Overview: This document provides the steps needed to configure Order Management System to integrate with Vertex Indirect Tax O Series® On Demand so that Vertex calculates tax for orders during order entry, pick slip preparation, and billing.
Compatibility: Order Management System version 15.1 and later is compatible with Vertex Indirect Tax O Series® 7.0 On Demand.
In this chapter:
• Before You Start: Taxability Considerations:
- Mapping Data from Order Management System to Vertex
- Setup within Order Management System
- Vertex wsdl (Web Service Definition Language) File
- Default Values by Company XML File
For more information: See Vertex Interface for an overview on the integration.
Before You Start: Taxability Considerations
Mapping Data from Order Management System to Vertex
Before you start the configuration steps described below, it is helpful to note the information in Order Management System that maps to corresponding values in Vertex.
OROMS |
Vertex |
Notes |
company (WCMP) |
taxpayer |
Typically, the Order Management System company code matches the Vertex taxpayer code; however, if you specify a Company in the Default Values by Company XML File, it overrides the actual company code. You might define a company override if the Vertex taxpayer is already set up in Vertex and you need to configure Order Management System to map to the existing taxpayer. |
entity (WENT) |
taxpayer |
Typically, the Order Management System entity code matches the entity-level Vertex taxpayer code; however, if you specify an Entity in the Default Values by Company XML File, it overrides the actual entity code. You might define an entity override if the Vertex taxpayer is already set up in Vertex and you need to configure Order Management System to map to the existing taxpayer. Used if the Pass Entity Code to Tax Interface (F69) system control value is selected and you do not specify a company code and division code in the Default Values by Company XML File. Set up with the company taxpayer as the parent, and configure all required data at the entity-level taxpayer. The entity on an order is determined by the division assigned to the source code on the order header. If you specify a Company and a Division in the Default Values by Company XML File, the Division specified overrides the entity code. |
item class (WICL)/ long SKU department (WLSD)/ long SKU division (WLSV)/ long SKU class (WLSC) |
product class |
Assigned in Order Management System to the item/SKU (MITM). Used to map to the product class in Vertex in order to apply tax exceptions. See Creating the Product Class, below. |
customer class (WCCL) |
customer class |
Assigned in Order Management System to the customer. Maps to the customer class in Vertex to apply tax exemptions. Note: • You can also flag specific customers as tax-exempt in Order Management System, and specifying an Exempt certificate number and Exempt expiry date. • If the customer on an order is assigned to a customer class in Order Management System that does not correspond to a matching class in Vertex, Vertex calculates tax as if there is no customer class assignment. |
Purpose: In order to set up product classes for taxability purposes, you can map your company’s item class, long SKU department, long SKU division, and long SKU class combinations to product classes (taxability drivers) in Vertex. The particular categories mapped, and the order in which they are mapped, is user-defined, so that you can select the product class hierarchy that best matches the way you group and classify items.
Identified where? The Product_Class_Concatenation_Type in the Default Values by Company XML File identifies the sequence in which to concatenate the four product class code components, with leading zeroes included.
What components can you include?
Component |
Identified as Element Number: |
item class (WICL) |
1 |
long SKU division (WLSV) |
2 |
long SKU department (WLSD) |
3 |
long SKU class (WLSC) |
4 |
The setting of the Product_Class_Concatenation_Type identifies the order in which to send these elements to Vertex in order to indicate an item or SKU’s product class.
Example: |
You set the Product_Class_Concatenation_Type to 2341. This setting indicates to concatenate the product class elements as: long SKU division (2) + long SKU department (3) + long SKU class(4) + item class (1). You enter an order for an item with the following assignments: • long SKU division: XYZ • long SKU department: 4 • long SKU class: 6543 • item class: FD Vertex receives a product class assignment for the item of XYZ00046543FD. Note that leading zeroes are included (for example, the long SKU department of 4 is included as 0004). |
Setup considerations: As a way to simplify the setup process, you can set the Product_Class_Concatenation_Type so that your most commonly used components are included first. For example, if you always use item class (1), sometimes use long SKU department (3) and never use long division (2)) or long SKU class (4), you can set the Product_Class_Concatenation_Type to 1324. Then when you set up product classes (taxability drivers) in Vertex, you only need to specify the item class (1) and long SKU department (3), as the integration concatenates those two values and leaves the rest of the product class blank.
Setup within Order Management System
• Use Generic XML Tax Interface (J10): Must be selected to have Order Management System communicate with Vertex.
• Use Standard Tax Calculation if Tax Interface Fails (J13): Select this value to have Order Management System use the standard tax calculation if it does not receive a response from Vertex. If you select this value, you will need to set up tax rates at the SCF level (WSCF) and/or the postal code level (WZIP).
• Pass Entity Code to Tax Interface (F69): Select this value to pass the entity associated with the source code on the order header to Vertex, provided you do not specify a Company and Division code in the Default Values by Company XML File. If you select this value, then you can set up product class or customer class tax exemptions at the entity level in Vertex.
• Tax Included in Price (E70): Must be unselected if your company integrates with Vertex.
• Send Tax to Vertex as Quote not Invoice (L11): Indicates whether billing should send a quotation or an invoice request message to Vertex when processing a shipment or a return.
Note:
• When you change a system control value, stop and restart the background jobs (MBJC) and exit and re-enter Order Management System to have your changes take effect.
• It is not necessary to set up the Tax on Freight (B14) or Tax on Handling (B15) system control values.
TAX_INT Integration Layer Job (IJCT)
For the TAX_INT job: Set the Communication type to Web Service and set the WSDL Document Name to CalculateTax70.wsdl. See Vertex wsdl (Web Service Definition Language) File for more information.
Because the TAX_INT job is always in INTERACT status, you do not stop or restart the job for your change to take effect.
Note: The TAX_INT job does not require a process queue.
Additional Setup in Order Management System
Create a customer class for exempt customers: Use Work with Customer Class (WCCL) to set up one or more classes of customers who are tax exempt, and then assign customers in Order Management System to the appropriate customer class. You can then set up the customer class(es) as tax exempt in Vertex. Similarly, set up product class exemptions and individual product (item) exemptions in Vertex. See Set up Data within Vertex for more information on setup steps in Vertex.
Note: If the customer on an order is assigned to a customer class in Order Management System that does not correspond to a matching class in Vertex, Vertex calculates tax as if there is no customer class assignment.
Set up specific customer tax exemptions: Use Work with Customers (WCST) to set up specific customers as tax exempt, including specifying their Exempt certificate number and the Exempt expiry date, or setting this information up for the customer in specific states or provinces. Order Management System passes this information to Vertex when a tax exempt customer places an order. It is not necessary to assign these customers to a particular customer class in order to flag them as tax exempt to Vertex.
Assign items and SKU’s to a product class hierarchy: Use Work with Items/SKU’s to assign items and SKU’s to the categories you use to identify product classes in Vertex, as described under Creating the Product Class.
Note: It is not necessary to set up tax rates or other settings at the SCF level or the postal code level if you are using the generic tax integration with Vertex.
Use the Sales Tax option within the Vertex Taxability Manager:
Set up company and entities as taxpayers in Vertex:
1. Set up a taxpayer for each company to integrate with Vertex. The taxpayer Code should match the company code and should be zero-filled (for example, company 3 in Order Management System = taxpayer Code 003 in Vertex). Assign the taxpayer to the appropriate jurisdictions, such as all U.S. states.
2. If you are sending entity information to Vertex, add a taxpayer for each entity for the related company, where the company taxpayer is the parent to the entity taxpayer. For example, if you are adding entity 100 for company 3, select taxpayer 003 in Vertex as the parent for taxpayer 100. Again, assign the taxpayer to the appropriate jurisdictions, such as all U.S. states.
3. If you would like to set up product class exceptions, use the Taxability Driver option in Vertex:
- Input Field = Product Class
- Code = the concatenated product class, as determined through Creating the Product Class
- Taxpayer = your company and, optionally, entity
- Taxability = Generally Taxable or 100% Exempt
- Use the Taxability Mapping option to associate the taxability driver to predetermined taxability logic as defined by Vertex
4. Set up product classes for freight, additional charges, and handling and map them to the appropriate delivery charge categories:
|
Line Item Type |
Product Class |
|
OF |
OF (Order Freight) |
|
LD |
LD (Line Duty) |
|
LH |
LH (line handling) Note: If the S/H exclude tax? flag is selected for an additional charge code, then a line that uses this additional charge code for special handling is not subject to line handling (LH) tax. See Establishing Additional Charge Codes (WADC) for background. |
|
AF |
AF (additional freight and shipper item charges) |
|
LF |
LF (line freight) |
Note: |
If you use the integration with Vertex to calculate taxes, then the settings within Order Management System to control tax on freight and handling (such as system control values and settings at the SCF and postal code level) are not used. |
5. Optionally, use the Customers option in Vertex to set up customer class exceptions:
- Type = Customer Class
- Code = customer class code
- Taxpayer = your company and, optionally, entity
- Taxability = set to 100% Exempt to indicate customers assigned to this customer class are exempt from tax
Note: If the customer on an order is assigned to a customer class in Order Management System that does not correspond to a matching class in Vertex, Vertex calculates tax as if there is no customer class assignment.
Define a Tax Assist Rule for Canada: In order to tax Canadian orders, the deliveryTerm passed to Vertex must be set to SUP. You can define a tax assist rule in Vertex as follows:
If Destination.Country ="CA"
Set deliveryTerm="SUP"
Use a text editor to edit the following files.
Important: Make a backup copy of each of the files discussed below before making any changes. Also, it is important that you do not make any changes in these files beyond those outlined in these instructions.
Vertex wsdl (Web Service Definition Language) File
Purpose: The wsdl file controls web service communication and other settings between Order Management System and Vertex.
File location and name: The wsdl file you use for integration with Version 7.0 On Demand of Vertex is named CalculateTax70.wsdl file, and is typically located on the application server at /domain/conf/cwdirectcpproperties where domain is the WebLogic domain directory for Order Management System.
Configuring the wsdl file:
• Search for REPLACE_WITH_VERTEX_SERVER_NAME and replace any instance in the file with the name or IP address of the server running Vertex. For example, replace https://REPLACE_WITH_VERTEX_SERVER_NAME/vertex-ws/xsd/7.0/VertexInc_Envelope.xsd with https://partners1.ondemand.vertexinc.com/vertex-ws/xsd/7.0/VertexInc_Envelope.xsd.
• Do not change anything else in the file.
Note: After making any change to the wsdl, you need to restart Order Management System to have your changes take effect. See Restarting Order Management System for more information.
Use the VERTEX_USERID and VERTEX_PASSWORD properties in Working with Customer Properties (PROP) to specify the user ID and password to use for connection to Vertex.
The user ID you specify should be assigned to the Vertex partition that includes the data that will be required by Order Management System.
The password entry here is encrypted. Also, the system masks the password for any transactions posted to the CWDirect Log or Trace Log.
Use the VERTEX_SERVICE_ENDPOINT_URL in Working with Customer Properties (PROP) to define the URL used to communicate with Vertex. An example of the URL is https://partners1.ondemand.vertexinc.com/vertex-ws/services/CalculateTax70.
The proxied.eternal.hosts setting in the Jenasys Properties File defines the necessary proxy information required for the integration. Verify this setting contains the Vertex server name followed by |www.vertexinc.com. An example of the setting is below, where partners1.ondemand.vertexinc.com is the Vertex server name:
partners1.ondemand.vertexinc.com|www.vertexinc.com where partners1 is server name
When communicating with Vertex, you must define a proxy server to act as an intermediary in order to increase security. Order Management System sends transactions to the proxy server and the proxy server sends the transactions along to Vertex. The PROXY_HOST and PROXY_PORT properties in Working with Customer Properties (PROP) define the IP address and port number used to connect to the proxy server during tax calculation.
Purpose: This file is required for the integration with Vertex and should not be changed.
File location: This file is typically located on the application server at /domain/conf/cwdirectcpproperties/VertexWS.xml, where domain is the WebLogic domain directory for Order Management System.
Purpose: This file contains information required for the Vertex web service. The Vertex web service runs outside of Order Management System and is used to transmit information between Vertex and Order Management System.
File location: This file is typically located on the application server at /domain/conf/cwdirectcpproperties/webservicemapping.properties, where domain is the WebLogic domain directory for Order Management System.
Note: This file is delivered with Order Management System and should not be changed.
Property Name |
Description |
TAX_INT |
This setting indicates Order Management System communicates with Vertex. The setting for Vertex is: com.cwi.direct.interfaces.webservice.VertexWS |
Default Values by Company XML File
Purpose: Use this file to specify default values to send to Vertex for each company that will use the tax integration.
File location and name: A copy of this configuration XML file is required for each company that will use Vertex. The files are typically located on the application server at /domain/conf/cwdirectcpproperties/xslt/VertexWS/, where domain is the WebLogic domain directory for Order Management System. The company number in the file name should be zero-filled; for example, the file name for company 49 is DefaultValues_049.xml.
Sample files: Your Order Management System installation includes a sample default values XML file for company 49 and for company 51. You can use these samples as starting points to build default values XML files for your companies.
Configuring the file: Each entry in the file is labeled by an ID, for which you enter the corresponding Value:
Default Value ID |
Value |
Company |
Optionally, use this field to enter an override company code to pass to Vertex that differs from the actual company number. See Configuring the Division and Company Codes for more information. |
Division |
Optionally, use this field to pass a division code to pass to Vertex. See Configuring the Division and Company Codes for more information. |
Product_Class_Concatenation_Type |
Indicates the sequence of the item class, long SKU department, long SKU division, and long SKU class to use when creating product classes (taxability drivers) for exceptions to default tax rules. See Creating the Product Class for setup considerations, and see Set up Data within Vertex for setup steps in Vertex. |
Call_Center_TaxAreaID |
The tax area ID to send to Vertex in order to identify your call center’s location. You can determine a location’s tax area ID in Vertex Central Home under Tools > Tax Area ID Lookup. |
Call_Center_Country |
This information is required by Vertex. |
Call_Center_City |
|
Call_Center_State |
|
Call_Center_PostalCode |
|
Call_Center_StreetAddress |
|
Default_Warehouse |
This information is required by Vertex. You also use the Warehouses XML File to indicate the tax area ID of each warehouse where you make shipments. |
Default_Warehouse_Country |
|
Default_Warehouse_City |
|
Default_Warehouse_State |
|
Default_Warehouse_PostalCode |
|
Default_Warehouse_StreetAddress |
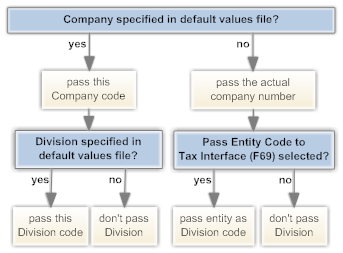
Configuring the Division and Company Codes
These fields in the Default Values by Company XML File enable you to override the Company and Division specified in the QuotationRequest, InvoiceRequest, and DistributeTaxRequest messages that Order Management System sends to Vertex.
Typically, the Order Management System company code and entity code matches the Vertex taxpayer code and entity level taxpayer code; however, if you specify a Company and/or Division in the Default Values by Company XML File, it overrides the actual company code and entity code. You might define an override if the Vertex taxpayer is already set up in Vertex and you need to configure Order Management System to map to the existing taxpayer.
• If you do not specify a Company here: Regardless of whether you specify a Division here, Order Management System passes:
- Company: The actual company code.
- Division: If the Pass Entity Code to Tax Interface (F69) system control value is selected, this is the entity code related to the source code on the order header. If the Pass Entity Code to Tax Interface (F69) system control value is not selected, no Division is passed.
• If you specify a Company here but not a Division: Regardless of the setting of the Pass Entity Code to Tax Interface (F69) system control value, Order Management System passes:
- Company: The Company code you enter here.
- Division: None.
• If you specify both a Company and a Division here: Order Management System passes the Company code and Division code you enter here.
Changes effective immediately: Changes you make to the default values by company file take place immediately. It is not necessary to stop and restart Order Management System.
Purpose: This file provides the list of warehouses from which you ship merchandise, so that Vertex can apply the appropriate tax rules for the shipping location.
File location and name: Like the default values by company XML file, a copy of this configuration file is required for each company that will use Vertex. The files are typically located under /domain/conf/cwdirectcpproperties/xslt/VertexWS/, where domain is the WebLogic domain directory for Order Management System. The company number in the file name should be zero-filled; for example, the file name for company 6 is Warehouses_006.xml.
Sample files: Your Order Management System installation includes a sample warehouses XML file for company 49 and for company 51. You can use these samples as starting points to build warehouses XML files for your companies.
Information in this XML file
First WarehouseValue element: The first WarehouseValue element at the beginning of the file indicates that the file provides a list of warehouse ID’s and their corresponding tax area ID values:
<WarehouseValue>
<ID>Warehouse</ID>
<Value></Value>
</WarehouseValue>
Do not change the default element.
Default warehouse tax area ID: The first warehouse entry in the file should indicate a warehouse ID of 000 and your company’s default tax area ID. For example, if the tax area ID is 220250100, the first entry is:
<WarehouseValue>
<ID>000</ID>
<Value>220250100</Value>
</WarehouseValue>
For each warehouse: For each warehouse where you will be processing shipments, enter the ID that identifies the warehouse code in Order Management System, and enter the tax area ID of the warehouse. For example, if warehouse 3 has a tax area ID of 140430510, enter:
<WarehouseValue>
<ID>003</ID>
<Value>140430510</Value>
</WarehouseValue>
Example: The following example defines tax area ID’s for warehouses 1, 2, and 3:
<WarehouseValues>
<WarehouseValue>
<ID>Warehouse</ID>
<Value></Value>
</WarehouseValue>
<WarehouseValue>
<ID>000</ID>
<Value>220250100</Value>
</WarehouseValue>
<WarehouseValue>
<ID>001</ID>
<Value>700151420</Value>
</WarehouseValue>
<Wxml2zarehouseValue>
<ID>002</ID>
<Value>140430510</Value><
/WarehouseValue>
<WarehouseValue>
<ID>003</ID>
<Value>140430510</Value>
</WarehouseValue>
</WarehouseValues>
Note: Make sure that the Default Warehouse (A04) is one of the warehouses included in this file.
Changes effective immediately: Changes you make to the warehouse XML file take place immediately. It is not necessary to stop and restart Order Management System.
| Avalara AvaTax Setup | Contents | SCVs | Search | Glossary | Reports | Solutions | XML | Index | Order Broker Configuration |

Vertex setup OROMS 17.0 2018 OTN